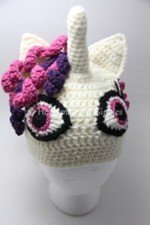
Unicorn Hat Crochet Pattern
A true classic for kids (and adults!)
This is another one of my older designs that I’ve moved over from my old blog on homemadebygiggles.com - that’s why you see all the watermarks on the images and they’re all blurry… I don’t have the originals :(
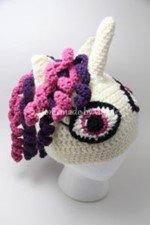
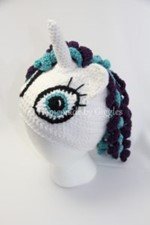
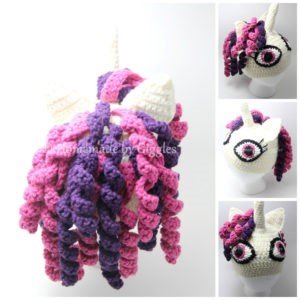
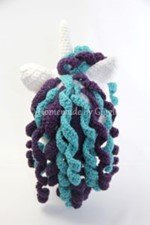
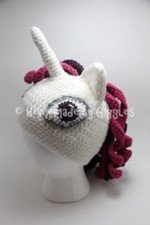
A true family favourite, this pattern has been made for kids in all kinds of fun colours and custom styles! When my daughter was young she was very into My Little Pony EVERYTHING so making this special hat for her was so much fun.
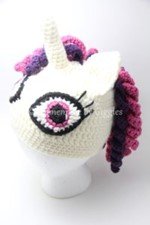
PRO TIP: the eye placement can really make or break this hat, so I’ve added extra notes AND a full video tutorial to help with the assembly!
My posts may contain affiliate links that help support the content on my site at no extra cost to you, so I can keep bringing you free patterns to enjoy and share with the world. Please review my Privacy Policy for more details, including my Copyright Policy about pattern making, credit and sharing. Happy crafting!
Sizing: Fits kids ages ~2-4 years. Move up a hook size for the base to make it fit 4-12 years.
Making time: ~2 hours, 1 to make the pieces and 1 for assembly
Materials needed:
4 mm crochet hook (4.5mm for older children)
Worsted weight yarn of your choice, I used Bernat Super Value
Tapestry needle
A small amount of stuffing
I used extra polyfill I had laying around, very similar to this Fiberloft filling
Tip: use new materials only and follow safety guidelines for toys/stuffing in your country/region
Optional: stitch marker
Stitch Glossary (US terms):
See here for a good instruction guide for basic stitches
ch - chain
sl st - slip stitch
sc - single crochet
sc2tog - single crochet 2 together (decrease)
sc3tog - single crochet 3 together (decrease by 2)
hdc - half double crochet
dc - double crochet
tr - treble (triple) crochet
dtr - double treble (triple) crochet
magic ring (instructions here)
Pattern:

Make it your own!
This adorable critter can be made in any colour and you can have fun with the shells… it’s a great project to share with kids in your life!
My sister gave my daughter some sea shells from a trip to Cuba, and she just loved them. We had recently seen an episode of a kid's show that had hermit crabs, so we looked online to see hermit crabs and found a few pictures of hermit crabs wearing shells just like hers! So I thought I'd make her a crocheted crab for her, finding some way to make the shells removable. And here is the result, please enjoy this pattern, including a couple of shell possibilities.
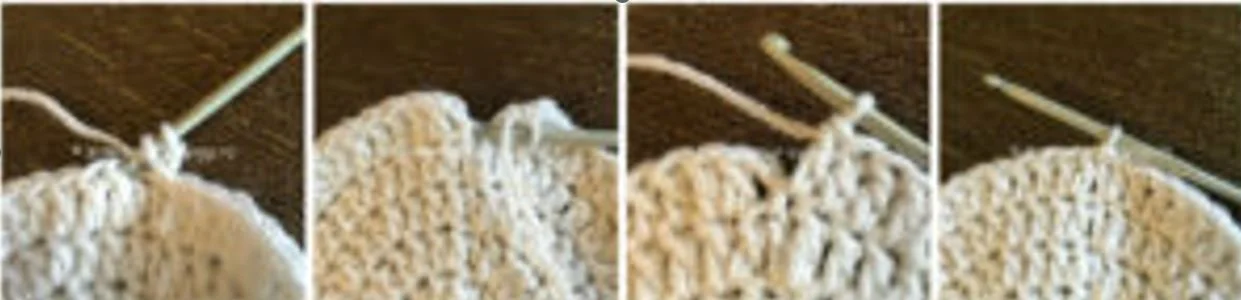
General note: when I do my dc rounds, I ch 2 and dc in the NEXT stitch, not the same stitch. Then I finish in the same stitch as the ch 2 and sl st with the first dc. A couple pics are below. This creates a slight arc where the rounds join but I find it to be the cleanest way to do dc in the round. The other option is to ch 2 and dc into the same stitch. Whichever way you do it, make sure you count your stitches to ensure you're not adding an extra stitch to the row or missing a stitch!
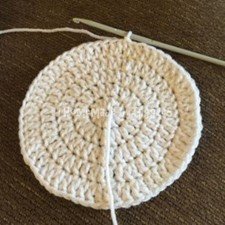
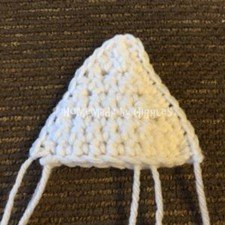
Hat:
Round 1: ch 2, 12 dc into magic loop, sl st into first stitch
Round 2: ch 2, 2 dc in each st around, sl st into first dc (24 st)
Round 3: ch 2, *2 dc in next st, dc in next st* repeat until end of round, sl st into first dc (36 st)
Round 4: ch 2, *2 dc in next st, dc in next 2 st* repeat until end of round, sl st into first dc (48 st)
Round 5: ch 2, *2 dc in next st, dc in next 3 st* repeat until end of round, sl st into first dc (60 st)
Round 6: ch 2, dc in each st around, sl st into first dc
Rounds 7-12: repeat Round 6
Round 13: ch 1, sc in each st around, sl st into first sc
Rounds 14-17: repeat Round 13
Fasten off

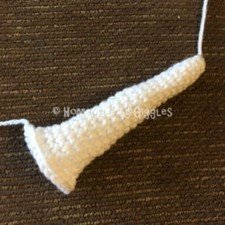
Horn: (worked continuously without joining and end of round unless otherwise stated)
Round 1: 6 sc into magic loop, sl st into first stitch (6 st)
Round 2: *2 sc in next st, sc in next 2 st* repeat once more (8 st)
Round 3: sc in each st around (8 st)
Rounds 4-8: repeat Round 3
Round 9: *2 sc in next st, sc in next 3 st* repeat once more (10 st)
Round 10: sc in each st around (10 st)
Round 11-15: repeat Round 10
Round 16: 2 sc in each st around (20 st)
sl st into first st of round
Fasten off, leaving long tail for sewing
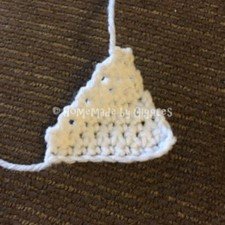
Ear: (make 4 - can do 2 pieces in a contrasting color for inner ear)
Row 1: ch 10, sc into second ch from hook and across, ch 1, turn (9 st)
Row 2: sc in each st across, ch 1, turn (9 st)
Row 3: sc2tog, sc in each st across until the last 2 st, sc2tog, ch 1, turn (7 st)
Repeat Rows 2-3 twice more (3 st)
Row 8: sc3tog
Fasten off
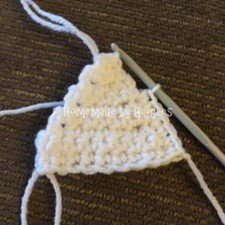
Ear Assembly:
Holding two ear pieces together (with a right side facing a wrong side), starting at the bottom right when right side is facing you, sc 2 sides of the triangle through both thicknesses, doing 3 sc in the top st and leaving the bottom of the ear open. Fasten off, leaving a long tail for sewing.
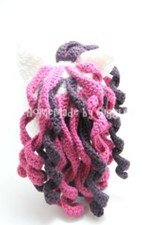
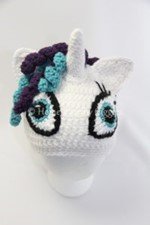
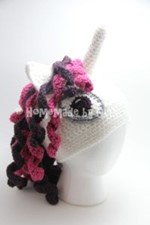
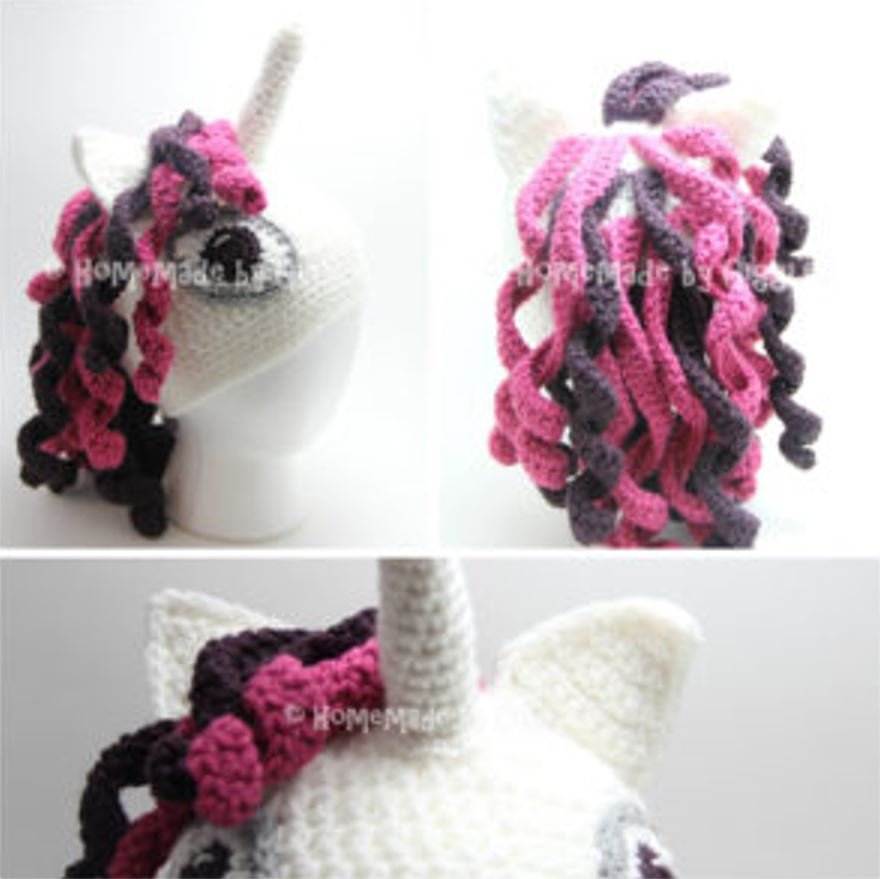
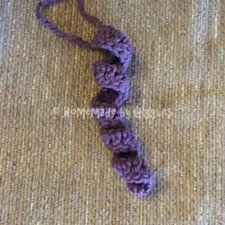
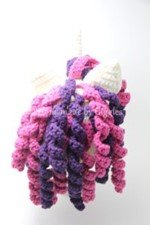
Back Mane: (make 16) - use various colours or spray with a glitter for extra effect!
ch 51, dc in 3rd ch from hook and across (50 st), fasten off.
Front Long Curls: (make 2)
ch 41, dc in 3rd ch from hook and across (40 st), fasten off
Front Short Curls: (make 2)
ch 31, dc in 3rd ch from hook and across (30 st), fasten off
Note: you can really make as much hair as you want for the mane, whatever length you want. This is just a guideline! If you form the curls with your fingers, they should stay in place. You can spray them with fabric stiffener if you want to keep them very curly!

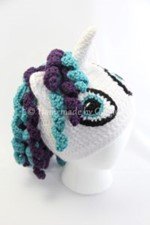
Eyes: (make 2)
With center eye color:
Round 1: 6 sc into magic loop, sl st into first sc
Round 2: 2 sc into each st around (12 sc) --> optionally change colours at this point to an eye accent colour
Round 3: *2 sc into next st, sc into next st* repeat until end of round (18 st)
sl st into first sc of round, changing to white eye color
Round 4: *2 sc into next st, sc into next 2 st, hdc and dc into next st, tr into next st, dtr into next st, dc and hdc into next st* repeat once more (24 st)
sl st into first sc of round, changing to outline eye color
Round 5: *2 sc into next st, sc into next 3 st* repeat until end of round (30 st)
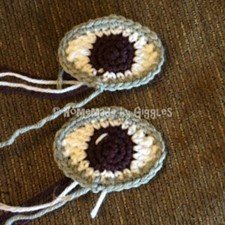
I use the loose threads to clean up any spots where the color changes were obvious. The picture below shows an unfinished eye at the top and a finished eye below (including a 'shine' embellishment). You can see more details in the full assembly video below as well!

Hat Assembly (with video!)
Here is an assembly video I did that details exactly how I put the hat together. Written instructions are also included below.
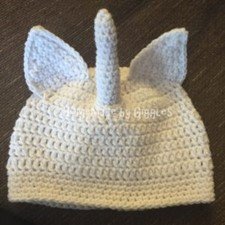
Center the horn in the middle of the front of the hat, 2 rows forward from the top middle of the hat. Stuff it as firmly as desired and sew in place. Sew the ears in place on either side of the middle, slightly in front of the middle of the hat. They should be sewn in a position so they curve forward on the edges to shape them. You can add a bit of stuffing if desired, I simply left a small gap between the front and back pieces to help give them their shape.
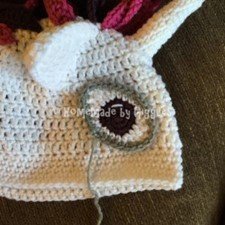
Attach the eyes so that they touch the first sc row at the bottom of the hat and angle towards the ear. There should be 6-8 stitches of space between them at the front, centered under the horn. Sew along the outer sc edge of the eyes to secure them in place.
Attach the short curls spaced evenly between the ears, with the longer front curls 1 round behind them. Then attach the mane pieces along the back, centered on the hat back. Put 4 curls together on a row, with 4 rows in total. The rows in my hat are spaced 2 rounds apart at the middle.
To secure the hair, I simply tied the 2 yarn ends together in a double know on the underside of the hat and trimmed. If you were more ambitious, you could sew them in place and weave in the loose ends. It's best to tie them first to ensure you're happy with their placement.


And just like that…
You have a beautiful AND functional hat, fun for any unicorn, pony or horse-lover. You can omit the horn if you want it to be more like a horse, or use straight yarn or braids if you want it to be a straight mane.
Customize it and make it your own!
“A unicorn is just a horse with a point of view.”